
Published in PetaPixel.com
Got published yesterday on the photography & camera news website PetaPixel after my ground pod photo was published in Audubon. Was contacted by one of their columnists recently requesting usage of my photo and looking for one of me in action with my ground pod.
He then contacted me later about using another one of my photos including some writing from me on why I like that photo. Stay tuned for that in Sept.
Thanks again Phil for the opportunity.
Great Reads in Photography: August 15, 2021
New Canon 100-400 II Lens
Since the new Canon 100-400 II lens came out, I’ve been reading the positive reviews and finally decided to take the plunge and replace my old 100-400. Unfortunately, my usual source for camera gear, B&H, along with most of the other reliable on-line retailers have been out of stock for several weeks. Ended up getting it at a local Best Buy.
Purchased my old 100-400 back in 2005 and used it for wildlife photography until I got my 500mm lens a couple of years ago. It’s been a great lens but needs some repairs. The rotating collar is worn out, for the second time, one of screw holes for the collar alignment pins has stripped out, and it needs to be torn apart and cleaned internally with some dust on the inner lens. Decided to invest in the new lens with its improved image stabilization instead of spending a few hundred dollars to repair the old one.
First impressions out of the box compared to the original model is that it’s a little heavier, the hood design is much improved, the rotating collar appears to be a better design and obviously the push-pull zoom design has been replaced with a twist zoom design. It will take some getting used to the new zoom mechanism as I loved the push-pull.
Will be taking the new lens along on some upcoming photography trips. I’m anxious to get it out into the field to try it out. I’ve ordered a RRS replacement foot to keep from having to add a plate like on my old lens and I’m not thrilled with the twist lock on the foot that comes with the new lens. This will be my go-to airshow lens and lens when shorter focal lengths are in order.
Here is a photo of the old and new 100-400. I’ll post some photos taken with the new lens when I’ve had a chance to try it out. Of course, it’s supposed to rain all weekend in SE Texas.

First Outing with Canon 1DX
After waiting for Canon to come out with a high-end crop sensor camera, finally decided it was time to upgrade from my 7D to a 1DX. I fought it for quite a while as full frame wasn’t on my radar due to losing the 1.6 crop factor of my 7D. With bird photography being my niche, being focal length limited can be a challenge. A recent trip to Nebraska convinced me that it was time to upgrade with missing some good shots while not being able to crank up the ISO enough to get higher shutter speeds. My 7D is a great camera but it gets noisy above ISO 400.
This was my first trip to High Island this year. Each season is a little different at the rookery with this year not being as good as previous years, IMO, with increased growth of the vegetation on the island covering up some of the best perching locations.
Besides the changing landscape, trying out a new camera was also challenging, especially when showing up in the dark about 45 min before the sun came up. Will need lots of practice with this puppy to get used to the button locations. Luckily the buttons to change focus points and ISO settings are similar to the 7D.
The ability to crank up the ISO to get higher shutter speeds was very sweet. Took most of my photos at ISO 1600, which look very similar to my 7D at ISO 400. I’ll post more later comparing the 7D to the 1DX after I get some more trigger time with the new camera.
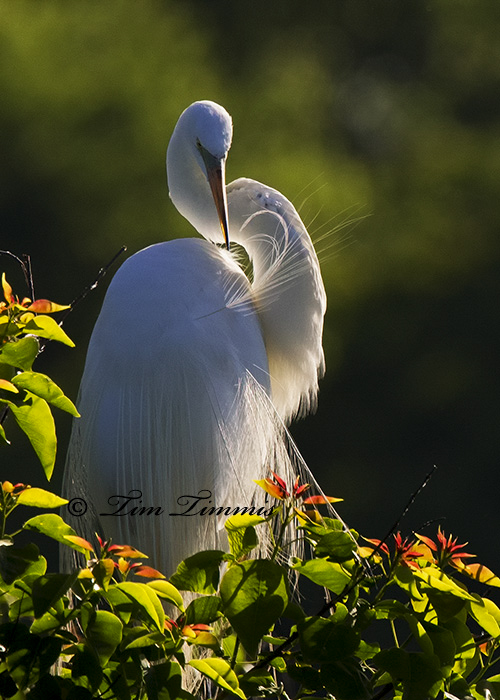
Taken with Canon 1DX and Canon 500mm F4 IS II with 1.4x III teleconverter mounted on Gitzo tripod with Wimberley II gimbal head
Great Egret preening: aperture priority, 1/2000 sec @ F11, ISO 1600, evaluative metering, -1/3 exposure compensation
7D Repaired/Returned
Got may camera back today via my friends at Fed Ex. Here is what Canon said about the repairs: “Your product has been examined and it was found that the internal component was broken causing the error to be displayed. The mirror box assembly and shutter assembly were replaced. Further, it was found that the top cover assembly has been submerged in liquid causing one or more buttons or controls to operate improperly. The top cover was replaced. Product functions were confirmed”.
To clarify, it wasn’t submerged in liquid but probably had some salt water dripped on it on a few/many occasions, for some odd reason. They replaced the back cover last time it was repaired so I’ve almost got a new camera at this point. I use a raincoat to protect the lens but the camera isn’t totally covered and it’s easy to have water drip off of my sleeves when I get up from lying on the water laden sand bars.
Now I have to reprogram all of the custom function settings. Good thing that I wrote them down.
While waiting for my camera to return, I ended up upgrading to Photoshop CC/Lightroom while the special deal was on for $10/month. Haven’t tried Lightroom yet but I like Photoshop CC so far. Also got the NIK software package since my old version of Noise Ninja wouldn’t work with Photoshop CC. I really like NIK Dfine for noise reduction. Color Efex Pro 4 looks very interesting as well. New toys to play with.
Here is another photo of a Long Billed Curlew from my last outing to Bolivar. More to come.
Taken with Canon 7D and Canon 500mm F4 IS II lens with 1.4x III teleconverter mounted on Skimmer ground pod with Wimberley II head
1/200 sec @ F 9, ISO 500, evaluative metering, + 1/3 exposure compensation

Reddish Egret Fishing
I’m always amazed at how good Reddish Egrets are at catching fish. They dart around with their wings extended and almost always come up with a fish. Other shore birds tend to stand around and watch as these guys are getting their stomachs full. I thought that last weekend was going to be a bust at Bolivar but it turned out to be one of my best Reddish Egret outings to date. There were tons of people camping out on the beach and lots of wade fisherman in the water off of the beach, which is not a good combination for bird photography. The beach was also not cooperating. About 75% of the beach was covered in several inches of dead seaweed, which I haven’t seen in this area before. It was also high tide which is the worst time to go. However, with wanting to try out my new 500 F4 IS II lens, I wasn’t going to wait.
Got some silhouette shots at sunrise and then headed down the beach to see if any Peregrine Falcons were around. No dice on the falcons so I headed back towards the car. A Reddish Egret was standing on the lone exposed sand bar near the parking area. He flew back down the beach so I followed him around for a while. Didn’t have much luck and ended up back at the sand bar and laid down to get some Willet shots. Then the fun began. Three Reddish Egrets then showed up to fish in my area with one being right in front of me. Good times were had by all of the local critters, especially me.
Taken with Canon 7D and Canon 500mm F4 IS II lens, 1.4x III teleconverter, mounted on Skimmer ground pod with Wimberley gimbal head.
1/400 sec @ F7.1, ISO 400, evaluative metering, + 1 exposure compensation

1/400 sec @ F7.1, ISO 400, evaluative metering, + 1 exposure compensation

1/500 sec @ F7.1, ISO 400, evaluative metering, + 1 exposure compensation

Reddish Egret Close-ups from Bolivar Flats
After five months, finally made it back to my favorite location for shore bird photography, Bolivar Flats. The high tides in the morning have kept me away but went back today to continue to test out my Canon 500mm F4 IS II lens. Very glad that I went as there was more action than anticipated, including several Reddish Egrets. Used the 1.4x III yesterday at Galveston and today at Bolivar. Didn’t even take the bag along to put the teleconverter in, which ended up being a mistake as one of the Reddish Egret’s was too close for 700mm. Had to settle on head shots several times. Ended up missing some great fishing sequences because that he was too close. Live and learn. The teleconverter worked well but the focus would hunt with busy backgrounds. Ended up using all focus points on the close up shots when he would go for the fish. I’ll post some of the action shots later. I’m going to have some fun with this lens.
Taken with Canon 7D and Canon 500mm F4 IS II with 1.4x III teleconverter, mounted on Skimmer ground pod with Wimberley gimbal head. These are all close to full frame shots.
1/640 sec @ F7.1, 700mm, ISO 400, evaluative metering, +1 exposure compensation, AV mode

1/1250 sec @ F7.1, 700mm, ISO 400, evaluative metering, +1 exposure compensation, AV mode

1/800 sec @ F7.1, 700mm, ISO 400, evaluative metering, AV mode

Canon 7D + Canon 500mm F4 IS II
Patience pays in wildlife photography from stalking your subject to waiting to upgrade your equipment. After 6 years of using my Canon 100-400 lens, I finally got the new Canon 500mm F4 IS II lens. It was pre-ordered from B&H back on May 28th and arrived on August 1. Of course I took the next two days off of work to test it out in the field. I’ve been dreaming of getting a 500 for six years so I wasn’t going to waste any time just looking at it. Also got the 1.4 EX III teleconverter and the full Wimberley head. I love my 100-400 and have had good success with it but it was time to crank it up a few notches and expand my horizons with a longer, higher quality lens. The following first impressions are based on using the 500 on my Canon 7D camera.
After I almost hugged the UPS guy who delivered it (I said almost), I ended up taking the stereotypical photos of unboxing the lens, just because it’s the law. Next steps involved taking comparison photos of it alongside my trusty 100-400 and putting on the camo lenscoat. I felt bad for my 100-400 as it now looks very puny in comparison. It has big time lens envy. Cheer up little buddy, you will still be my go-to lens for airshows.

My first impression, other than it’s much larger than my 100-400m (well duh), is that it feels lighter than I expected. I knew that they had reduced the weight by 1.5 lbs from the previous version but it seemed very light compared to the size. Getting the lenscoat on the lens took a few minutes to get all of the pieces in place. Looks and feels great. I replaced the lens foot with a RRS replacement foot which is lower profile and lighter. I then mounted the lens on my new Wimberley head to see how it worked before heading out the next morning. The full Wimberley head works great and feels much smoother than the Wimberley Sidekick gimbal mount that I was using with the 100-400 lens.
Day 1 – Field Test
Headed out to Brazos Bend State Park before sunrise. Got my gear assembled in the parking lot and headed down the trail with my tripod slung over my shoulder, asking myself did I get everything tightened down well enough? Although the new lens is lighter than its predecessor, it still weighs 7 lbs and is much heavier than my old lens. Definitely could feel the weight difference on my shoulder. I left the flash off as my new flash bracket section to attach to the Wimberley head was going to be delivered that day.
My first subject was a Green Heron. First impression of the lens in action was that the focus is very quick and F4 is going to be great compared to F5.6 of my old lens. Getting decent shutter speeds that early in the morning is going to open up some possibilities that I didn’t have before. The Green Heron wasn’t doing much so I moved on.
Next stop along the trail found several juvenile Purple Gallinules walking around in a group of lily pads. Had some initial issues with trying to find the subject with the longer fixed lens compared to my 100-400. When I looked through the lens for the first few times, the birds were always above where I was initially aiming, although it didn’t take long to get used to that.
Moved down the trail and found 8 juvenile Little Blue Herons fishing. That gave me a chance to practice action and flight shots with the new lens. I ended up not attaching the 1.4x teleconverter as the birds were too close to use it, which is a good thing. Didn’t have any problems using the new lens while keeping up with the action. It felt very natural and easy to maneuver on the Wimberley head. Could track the birds in flight without any problems. Caught a couple of whistling ducks doing a fly by and quickly locked focus on them. Had the usual challenges with keeping the white birds properly exposed with changing light conditions but no issues with the lens. Had to use the manual zoom feature of the new lens, i.e. my feet, a few times when the birds were too close.
Ended up spending about 2.5 hrs at Brazos Bend the first day and my first impressions were great however, more practice and testing would be required. Good excuse to go out the next two days as well.
1/1600 sec @ F4, ISO 400, spot metering

1/1600 sec @ F5.6, ISO 250, spot metering

Day 2 – Field Test
Went back the next day to Brazos Bend to practice some more. Met Doug at the park to check out his new camera and got a pleasant surprise when Sheldon showed up. The birds weren’t as cooperative as the day before so I got more hiking in and my shoulders felt it by the end of the trip. We did come across a somewhat stubborn Alligator lying near the trail that didn’t want to move. He did open his mouth a few times for some decent shots and gave me the opportunity to take the lens off of the tripod and tried lying down on the ground with it to get some full frame eye level gator shots. It balanced fairly easily on my elbows. Wouldn’t want to do it for a long period but it worked fairly well. Made me want to head to the beach to try out the lens with my ground pod, which was on the agenda for the next day.
I did attach the 1.4X III teleconverter but didn’t use it much as the birds were too close to effectively use it. First impressions are still pending on the teleconverter.
AV, 1/5000 sec @ F4, ISO 400, evaluative metering

AV, 1/500 sec @ F5.6, ISO 200, evaluative metering

Day 3 – Field Test
Headed to Galveston Island to break in the lens properly with some sand and salt water at the Gulf of Mexico. Went to East Beach near the jetty and broke out the ground pod. Wanted to go to Bolivar but high tides in the mornings this time of year make Bolivar an unattractive option for low-level photography. Not much was happening at East Beach each except for a few Willets near the shoreline. Laid down for about ½ hr on top of some piled up dead seaweed to try out the lens with the Wimberley head mounted on my Skimmer ground pod. The combo worked great. This is where the lens will really shine for me with the narrow depth of field and better blur on the backgrounds. The narrow depth of field with this lens will take some getting used to. I used to shoot my 100-400 wide open most of the time at F5.6. Can’t shoot everything at F4 or the bird may not be in focus over his whole body, depending on how close that he is. It will take some practice to get used to the required settings to use for different situations. The challenge with using a ground pod is that it’s difficult to keep it level so you have to level the shot in the camera view finder by loosening the tripod collar knob and manually rotating the lens to the level position. It takes a little more effort doing it with the larger lens than with my 100-400 lens.
After shooting from the prone position, got up and wandered down the beach to try out some hand-held flight shots. Again, the lens focused very quickly and worked well. It is definitely hand holdable but I wouldn’t want to do it all day. Had no problem holding the lens for about ½ hour while shooting terns and pelicans.
Left the beach and headed to the Texas City Dike looking for black skimmers that were nesting there last year at this time. No skimmers around but ended up finding a couple of cooperative American Oystercatchers at the dike and shot them out the car window while hand holding the lens. One was walking along the edge of the dike on the rocks so I followed him with the car. Got nearly full framed shots. The light wasn’t ideal but it was a great opportunity to try out the new lens. Note to self: put your beanbag back in the car.
1/1250 sec @ F4, ISO 400, spot metering, +1/3 exposure compensation

AV, 1/2000 sec @ F5.6, ISO 400, evaluative metering, +2/3 exposure compensation

1/1250 sec @ F4, ISO 250, spot metering, +1/3 exposure compensation

First Impressions – Summary
- It’s very sweet lens (that’s a technical term) and a keeper
- Focus is quick and accurate
- F4 is great for early morning photography
- Lens is light enough to hand hold but I’ll still use a tripod/ground pod most of the time
- Only used IS mode 1 so far and need to test modes 2 & 3
- Extra reach of the 500mm lens compared to my 100-400mm lens is going to be very nice with the ability to use the 1.4x to get to 700mm
- Works great with the full Wimberley head
- Narrow depth of field will take some getting used to but will lead to some great photos, especially from the prone position
- Blurring of backgrounds is excellent
- Having a high quality lens won’t make you a good photographer. It can help to improve the quality of your shots but it’s still up to you to be at the right place at the right time to get the shot in the right conditions/lighting and properly expose the photo
- I’m very lucky to live in SE Texas
- I’m going to have lots of fun!
7D Saga Continues
I thought that the second time that I sent my 7D back to Canon for service would be last, but I was sadly mistaken. Got the camera back a week ago from Canon and they replaced the same “mirror box assembly” as they did the first time. Took it out on Friday to shoot and everything was looking good for about 600 shots and then it started acting up again with the same error 20 message and locked up mirror. Hoping that the 3rd time is really the charm. I love this camera but this is getting old very fast.
7D Repaired
I got my 7D back today from Canon. The repair ticket said: “mirror box cam gear assembly, back cover and CF cover assembly was replaced and product functions were confirmed. The image sensor assembly was cleaned. Other electrical adjustments, inspection and cleaning and parts replacements were carried out.”
This ended up not being a warranty repair because they found “rust on the body”. Apparently salt water and cameras don’t really mix after all. Total cost including sales tax and shipping was $216, which is about the same price that I’ve had to pay for previous shutter replacements on my other cameras. Must be a universal price for most repairs.
Here is a timeline in case anyone is interested in how long it may take for Canon to repair a camera.
4/8 – Camera started acting up with error 20 and mirror kept locking up
4/9 – Tried camera again but still had same problem. Came home and went to Canon website to fill out the repair request form. Got an e-mail from Canon very quickly with authorization/repair order number. Boxed up the camera and dropped off with Fed Ex for 3 day delivery
4/14 – camera arrived at Canon factory service center in Irvine, CA
4/18 – Received e-mail from Canon with estimated repair cost and notice that it wouldn’t be a warranty repair. The e-mail said: “Error 20. Also rust on body, CF door sticks – difficult to open, specified issue not covered under warranty”
4/19 – Called Canon to discuss warranty repair issue. Didn’t win the argument and wanted my camera repaired/returned ASAP so I went on-line and paid for the repair via credit card
4/20 – Received e-mail from Canon that the repair had been completed and the camera was being shipped that day back to me via Fed Ex
4/22 – Received camera around 11:00 a.m.
Now going to take some time to reset all of the custom functions back to where I had them. As stated in my other post, when they repair a camera, they reset every setting back to the original factory settings. Hoping to get out this weekend to try this puppy out. All is right with the world again. Well, my little part of it anyway…
Canon 7D Custom Function Settings
I’ve had a few people interested in my 7D settings so I’ve decided to share them. The Canon 7D is a great camera with many advantages over my old 40D. However, it is more complicated to use and set up properly. I did lots of research on the web and got advice from other photographers on the custom function settings. Here are my settings for wildlife photography. Once you get the settings that you like, I’d highly recommend that you write them down. If you send your camera in for repairs, like me, they change all of your settings back to the original factory settings. If you didn’t write them down you have to start over again.
| Custom Function | Description | Setting | Setting Description | Notes |
| C.Fn I: Exposure | ||||
| 1 | Exposure level increments | 0 | 1/3 stop | |
| 2 | ISO speed setting increments | 0 | 1/3 stop | |
| 3 | ISO Expansion | 1 | On | |
| 4 | Bracketing auto cancel | 0 | On | |
| 5 | Bracketing sequence | 0 | 0,-,+ | |
| 6 | Safety shift | 1 | Enable | |
| 7 | Flash sync speed in AV mode | 0 | Auto | |
| C.Fn II: Image | ||||
| 1 | Long exposure noise reduction | 0 | off | |
| 2 | High ISO speed noise reduction | 0 | standard | Affects JPG’s only. Depends on how much in-camera noise reduction that you want when shooting jpgs. |
| 3 | Highlight tone priority | 0 | disable | may cause more noise if enabled |
| C.Fn III: Autofocus/Drive | ||||
| 1 | AI Servo tracking sensitivity | 1 | Slow | Keeps AF from hunting too quickly if you lose focus temporarily |
| 2 | AI Servo 1st/2nd image priority | 0 | AF priority/tracking priority | |
| 3 | AI Servo AF tracking method | 1 | Continuous AF track priority | |
| 4 | Lens drive when AF impossible | 0 | Focus search on | |
| 5 | AF microadjustment | 0 | Disable | |
| 6 | Select AF area select move | varies | ||
| 7 | Manual AF point selection pattern | 1 | Continuous | |
| 8 | VF display illumination | 1 | Enable | |
| 9 | Display all AF points | 0 | Disable | |
| 10 | Focus display in AI Servo MF | 0 | Enable | |
| 11 | AF assist beam firing | 1 | Disable | |
| 12 | Orientation linked AF point | 1 | Select different AF points | |
| 13 | Mirror lockup | 0 | disable | |
| C.Fn IV: Operation / Others | ||||
| 1 | Custom controls | default | personal perference | |
| 2 | Dial direction during TV/AV | 0 | Normal | |
| 3 | Add image verification data | 0 | disable | |
| 4 | Add aspect ration information | 0 | Off |
My 7D is D.O.A.
My Canon 7D died this weekend. It started acting up on Friday at FeatherFest at San Luis Pass. Shutter would lock up with error 20. Took the battery out and got it to work after trying it several times. Went back out yesterday to Brazos Bend and it started doing it again. Took it back to the car and got my 40D. I forgot how much difference there is between the 7D and the 40D. The autofocus on the 7D blows the 40D out of the water. There is no comparison. Got frustrated and left early. Packed the 7D up and sent it back to Canon for repairs.
I’m guessing that the shutter will have to be replaced, which is a surprise since I’ve only had it since last June. I’m guessing that I’ve got around 100,000 actuations with 85 shooting trips in the last 10 months. The 7D’s shutter is supposed to be rated for 150,000 actuations. I’ve been through 4 shutters on my other cameras so this may be the 5th. I’ll just have to wait and see what Canon says.
